[Original post: 10/12/2010. This is an article from my old blog that I think is interesting enough to restore.]
Overview
The previous (and first) article on video motion tracking featured a video which touched on the workings of my motion tracking project using Java and JMF. In this article I hope to give you more detail. Also, I've been pleased to hear from others interested in the subject, and at your request, I am making the program and source code available to you for download.
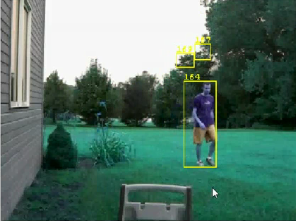
The goal of the motion tracking algorithm is to be able to take video frames as input, and determine the locations of moving objects in the video. The moving objects will have a numeric id, and a bounding rectangle. For example, suppose we have a video whose fifth through twentieth frames shows a person walking across the scene. For each of those frames, the algorithm should give us a rectangle with an ID of 1 (the first and only moving object). In the first frame including the object (frame 5), the bounding rectangle is at the left side of the screen (supposing that the person is walking from left to right). Then in each successive frame, the rectangle coordinates will be further toward the right of the screen.
You can probably imagine many things that could be done with such simple output as bounding rectangles. For example, you could calculate the center of the rectangle and set the computer's mouse cursor to that position, and thereby control the mouse with a moving object in a webcam's view. Or, given a camera's view angle and distance from a road, you could measure the speed of each vehicle that drives by.
The motion tracking algorithm I used was based on knowledge of traditional techniques gathered from here and there on the Internet. It involves a chain of transformations to each video frame. This image processing chain is described in detail in the following section.
Image Processing Chain
The main idea of the image analysis is to first know what the scene looks like when there are no moving objects around (we call this the "background" image), and then compare each new frame with the background image to see if there are any foreground objects. We will reference the block diagram below as we step through the processing chain.

Difference
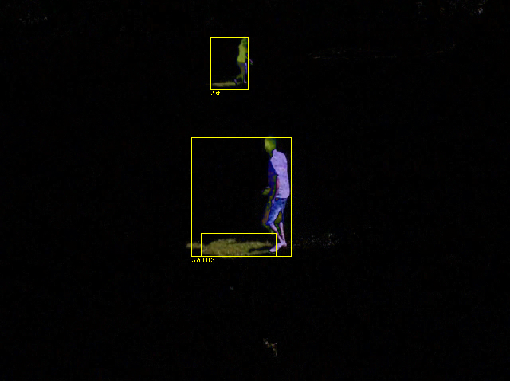 First we take the difference between the current video frame and the background image. An example image is shown below. You can see that two people are readily distinguishable. The pixels that are almost exactly the same we will assume to be part of the background; the pixels that are very different are probably part of moving objects. We will look later at how the background image is maintained. The difference is literally calculated as the absolute value of the difference between the red, green, and blue components of the frame's pixel and the background's pixel. You can find the code for this step in the RgbDiffEffect class in the package net.joelbecker.video.processing.
Threshold
 Threshold of differenceBecause of noise in the video ("fuzziness", "static", "blurriness", etc.), there will be some minute difference between almost all of the pixels of the frame and background. We are really only interested in a large difference, which is much more likely to be an actual foreground object. Therefore we apply a threshold. A threshold simply says, if A > B then we care about it, otherwise completely ignore the pixel. The resulting image is purely black and white. The white pixels are foreground pixels, and the black are background.
Pixelization Dilate
At this point we have our moving objects as blobs of white pixels. But a bunch of white pixels still doesn't quite give us our rectangles yet. We need to group the white pixels together into complete objects, with rectangular bounds. However, most of the time the object's foreground (white) pixels will be rather scattered. For example, notice in the threshold image above the separation between the people and their shadows, and even between their feet and legs. Pixelization Dilate
![]() The result of grouping neighboring pixels would be separate objects for shadows, feet, torso, and maybe head. It'd be really nice to keep these poor people together in one piece. Thus our next step in the image processing chain is dilation. Dilation basically makes each pixel spread into the pixels around it so that white pixels close to each other end up touching, and forming a single blob of pixels. There are several ways to do this. I chose a less traditional way because it is probably the fastest method of dilation there is: pixelization. Pixelization, or down-sampling, granulates the image into larger pixels. The particular implementation of pixelization i wrote is speicifically for dilation, in that it favors white pixels. For example, for a 5x5 pixel square that will become one large pixelated pixel, if any of the 25 pixels in the box are white, we make the entire large pixel white. Normal pixelization would just average the 25 pixels, or arbitrarily choose one of the pixels for the color. By biasing toward the white pixels, we get our objects into one piece better. (Is it just me, or does that pixelization screenshot not remind you of the days of going over to your friend's house and playing the Atari?)
The result of grouping neighboring pixels would be separate objects for shadows, feet, torso, and maybe head. It'd be really nice to keep these poor people together in one piece. Thus our next step in the image processing chain is dilation. Dilation basically makes each pixel spread into the pixels around it so that white pixels close to each other end up touching, and forming a single blob of pixels. There are several ways to do this. I chose a less traditional way because it is probably the fastest method of dilation there is: pixelization. Pixelization, or down-sampling, granulates the image into larger pixels. The particular implementation of pixelization i wrote is speicifically for dilation, in that it favors white pixels. For example, for a 5x5 pixel square that will become one large pixelated pixel, if any of the 25 pixels in the box are white, we make the entire large pixel white. Normal pixelization would just average the 25 pixels, or arbitrarily choose one of the pixels for the color. By biasing toward the white pixels, we get our objects into one piece better. (Is it just me, or does that pixelization screenshot not remind you of the days of going over to your friend's house and playing the Atari?)
Update Background
Now we have coherent pixel blobs representing the foreground objects. Before we group them into individual objects, we need to take care of our background image. During the course of a video stream, the scene is likely to change slightly. For example, in an outdoor scene, clouds moving overhead can change the overall lighting of the scene. We'd rather not detect cloud shade as giant moving objects. Our background image needs to adapt to these slow or global changes. This is a difficult problem to get working well. For now I chose a simple solution. First, before any motion tracking can be performed, the initial background image must be captured (when no foreground objects are in the scene). That is the purpose of the "Recapture Background" button in my motion tracking program. After that, each pixel of the background is updated slightly according to the new frame's pixel colors, but only the background pixels are updated. That is, only the pixels with corresponding black pixels in the threshold image above will be adjusted. If we included the foreground pixels, then a red object would cause our background image to start turning red wherever the object moved. So instead we ignore whatever pixels are influenced by foreground objects. That we must utilize the threshold image is why the "Update Background" process block comes after the threshold.
Blob Detector
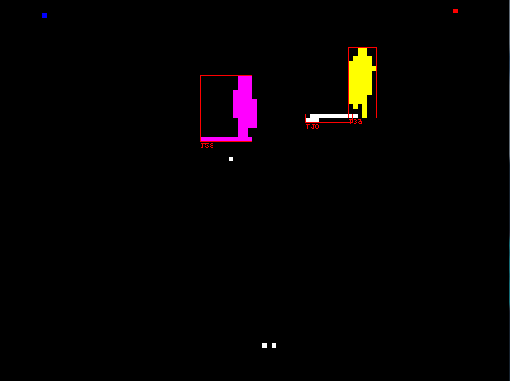 Blob detector (labeling)Now that we've taken care of our background image, we are finally ready to locate the foreground objects! The method is commonly called "image labeling." It is the process of labeling each pixel with a number identifying which object it belongs to. In the example image, the purple pixels are all labeled with the same number, and likewise the yellow pixels have their own shared number ID. As these "blobs" are found, their bounding rectangles are also calculated. This gives us our goal output: rectangles with numeric IDs!
Labeling is not a trivial algorithm to implement (as I well found out), nor is it widely discussed. In short, see the freely-available code :) , specifically the class FourNeighborBlobDetector in the package net.joelbecker.vision.blob.detector. The basic idea is to do a flood-fill, much like that of a basic paint program (you know, the can of paint that's spilling all over the place). A traditional flood-fill algorithm is not meant for real-time video processing, though, so I used a much more efficient algorithm.
Blob Correlator
Again, there are a number of ways this can be done. I implemented a rather simple correlator that simply calculates the difference between the positions each pair of blobs between successive frames. If frame 1 has blobs A and B, and frame 2 has blobs C and D, then we calculate the difference between the positions of A and C, and between A and D. If C's position is closer to A's position, then C is more likely to be the same object.
Future Improvements
The current implementation uses the Java Media Framework (JMF). Each image processing step implements the JMF Effect interface. No attempt was made to use languages and tools that would provide high-performance. In fact, my laptop was not able to keep up real-time for a 640x480 video at 30 frames per second. (This is eight times as much data to process as a 320x240 video at 15 fps.) Here is a list of some future improvements that could be made, and that I hope to make in the future as time permits:
- Use higher-performance image processing functions, like the Java Advanced Imaging API, or one of the Java interfaces to (OpenCV)[http://opencv.org]. *Decouple the image processing API from JMF. This will allow (1) using other than JMF, (2) a more flexible, well-designed image processing framework, and (3) processing BufferedImages instead of the raw byte arrays that Effects process.
- Improve the background updater.
- Use a better dilation method. Pixelization is lossy.
- Using higher-performance image processing primitives would make a better dilation method practical.
If you haven't already, feel free to download the project so you can browse the code and try it out yourself. Happy motion tracking.